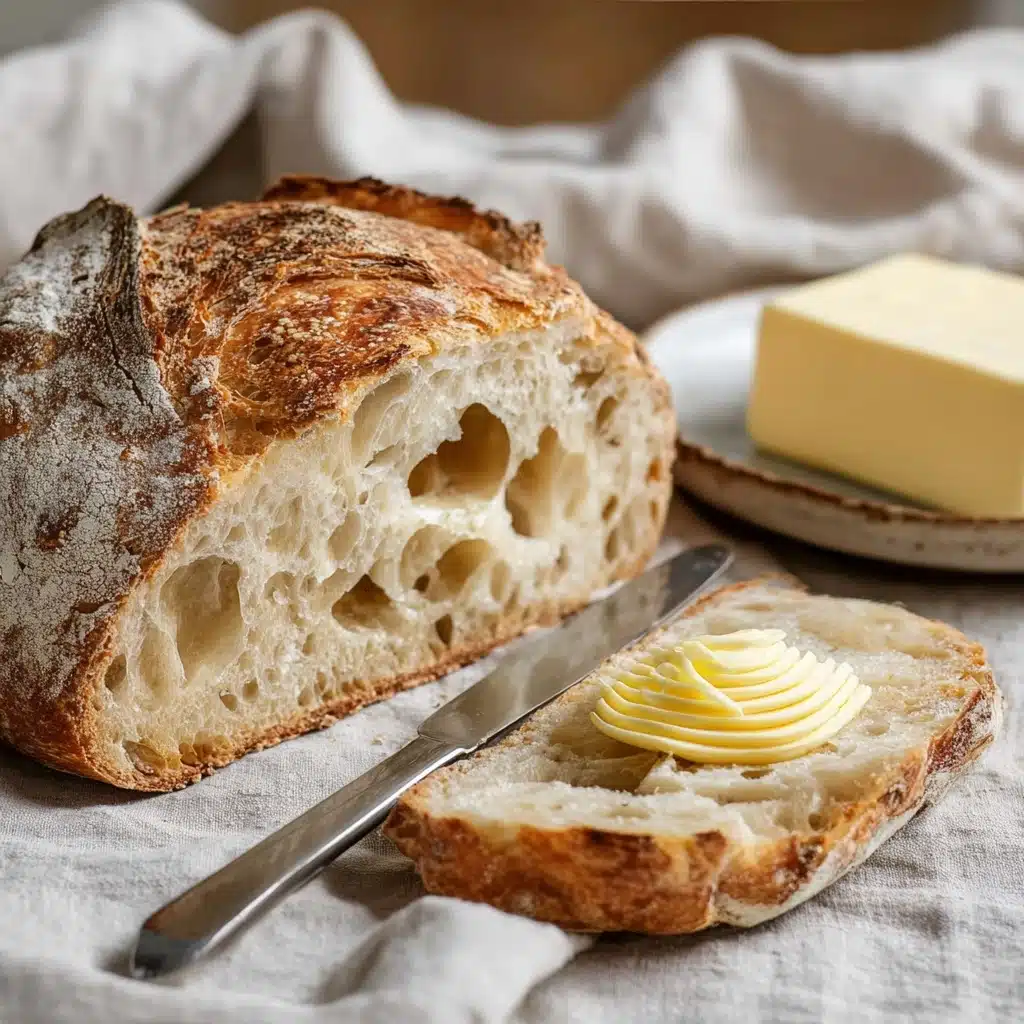
Artisan Bread Recipe
There is something truly magical about baking your own bread, and this Artisan Bread Recipe brings that warmth and satisfaction right into your kitchen. Its simple ingredients come together to form a rustic loaf with a perfectly crisp crust and a soft, chewy crumb that tastes far more complex than the few components it contains. Whether you’re a seasoned baker or just starting out, this Artisan Bread Recipe is incredibly approachable yet impressively delicious, inviting you to experience the joy of homemade bread in the most rewarding way.
Ingredients You’ll Need
Gathering the right ingredients is the first step to baking a stunning loaf of artisan bread. Each element is straightforward but plays a crucial role in shaping the flavor, texture, and appearance you’ll love.
- 3 cups (395 grams) all-purpose or bread flour: The foundation of your bread, providing structure and that lovely chew.
- ½ tablespoon kosher salt: Enhances flavor and controls yeast activity for the perfect rise.
- ¼ ounce instant or active dry yeast packet (2 ¼ teaspoons): The magic agent responsible for making your bread rise and develop character.
- 1 ½ cups warm water (105°F): Activates the yeast and hydrates the flour, essential for developing the dough’s texture.
How to Make Artisan Bread Recipe
Step 1: Combine Ingredients
Start by mixing the flour, kosher salt, and yeast in a large bowl. Using warm water, pour it over your dry ingredients and mix until everything just comes together. Your dough should feel sticky but still manageable at this stage — this rustic texture is key to a great artisan loaf.
Step 2: Let the Dough Rise
Cover the bowl with a towel or plastic wrap and let the dough rise at room temperature. This can take anywhere from 2 to 10 hours, but for the most flavorful, deeply developed crust and crumb, letting it rise overnight works wonders. Patience here really rewards you.
Step 3: Shape the Loaf
Once your dough has doubled in size and is bubbly on the surface, wet your hands to prevent sticking and gently turn it out onto a lightly floured surface. Fold the edges toward the center, forming a round loaf. You can split the dough into two smaller loaves if you prefer. Tuck the ends underneath to tighten the shape.
Step 4: Prepare for Baking
Place the shaped dough onto a piece of parchment paper and dust the top with a little flour. Score the surface with 1 to 4 lines using a sharp bread knife. This allows the bread to expand beautifully while baking. Let it rest for 20 to 30 minutes—just enough time to preheat your oven and equipment.
Step 5: Bake Your Bread
Preheat your oven to 450°F with your chosen baking surface inside: a baking stone, pizza stone, Dutch oven, or iron skillet all work brilliantly to create that artisan crust. Slide the parchment with dough onto the hot surface. To get a crispier crust, toss 1 cup of hot water or about 5 ice cubes into the oven’s bottom to create steam. Close the oven door quickly to trap it all in. Bake your loaf for 25 to 30 minutes until it’s golden brown and crusty. Let it cool on a rack for at least 30 minutes before slicing to set the crumb inside.
How to Serve Artisan Bread Recipe

Garnishes
This rustic bread shines on its own, but a sprinkle of flaky sea salt or a brush of garlic-infused olive oil can elevate its natural flavors even more. Fresh herbs like rosemary or thyme gently pressed into the crust before baking also add a wonderful aromatic touch.
Side Dishes
Artisan bread pairs beautifully with so many dishes. Think rich stews, creamy cheeses, or a bowl of homemade soup. Its chewy texture is perfect for dipping and soaking up robust flavors, making it an ideal sidekick for your meals.
Creative Ways to Present
Serve slices of your homemade artisan bread on a wooden board alongside an assortment of olives, cheeses, and cured meats for a charming rustic platter. Or turn it into a hearty bruschetta by topping toasted slices with fresh tomatoes, basil, and a drizzle of balsamic glaze.
Make Ahead and Storage
Storing Leftovers
To keep your artisan bread fresh, store it in a paper bag. This helps maintain the crust’s crispness and prevents moisture buildup that can make the bread soggy.
Freezing
If you want to save your bread for later, slice it and freeze the pieces in an airtight container or freezer bag. This way you can enjoy a slice whenever the craving hits without worrying about waste.
Reheating
To revive your artisan bread, bake slices in a preheated oven at 350°F for 5 to 7 minutes. This brings back that lovely crusty texture and soft inside, making it taste almost fresh-baked all over again.
FAQs
Can I use whole wheat flour instead of all-purpose flour?
Yes, you can substitute whole wheat flour, but keep in mind it may result in a denser loaf and a slightly different flavor. For best results, try a blend of whole wheat and all-purpose flour.
How important is the temperature of the water?
Water that is too hot can kill the yeast, while water too cold will slow down fermentation. Aim for around 105°F to provide an ideal environment for yeast activation and a good rise.
What’s the purpose of creating steam in the oven?
Steam helps develop a crisp, chewy crust by keeping the dough’s surface moist early in baking and allowing it to expand fully before setting.
Can I make this bread without a baking stone or Dutch oven?
Absolutely! A heavy-duty iron skillet or a baking sheet works well. Just be sure to preheat it thoroughly to replicate the even heat distribution needed for a great bake.
How long can I store the bread at room temperature?
For best texture and flavor, consume within 2 to 3 days. Beyond that, the crust will soften, and the bread may become stale, but freezing can extend its life.
Final Thoughts
There’s nothing quite like the pride and deliciousness of baking your own artisan bread at home. This Artisan Bread Recipe, with its straightforward ingredients and simple steps, invites you to dive into the timeless pleasure of homemade bread. Once you try it, you’ll see why it quickly becomes a cherished favorite that fills your kitchen with warmth and your heart with joy. Happy baking!
PrintArtisan Bread Recipe

This artisan bread recipe creates a crusty, rustic loaf with a soft, chewy interior, perfect for sandwiches, toasts, or enjoying fresh with butter. Utilizing simple ingredients and a long fermentation process, it develops exceptional flavor and texture without kneading.
- Prep Time: 10 minutes
- Cook Time: 30 minutes
- Total Time: 2 hours 40 minutes to 10 hours 40 minutes plus cooling time
- Yield: 1 large loaf or 2 medium loaves 1x
- Category: Bread
- Method: No-knead, Oven-baked
- Cuisine: American Artisan
- Diet: Vegetarian
Ingredients
Dry Ingredients
- 3 cups (395 grams) all-purpose flour or bread flour
- ½ tablespoon kosher salt
- ¼ ounce instant or active dry yeast packet (or 2 ¼ teaspoons)
Wet Ingredients
- 1 ½ cups warm water (105°F)
Instructions
- Mix Dry Ingredients: In a large bowl, combine the flour, kosher salt, and yeast thoroughly to ensure even distribution.
- Add Water and Combine: Pour the warm water over the dry ingredients and mix using a spoon or your hands until the dough is sticky yet manageable. Avoid overmixing.
- First Rise: Cover the bowl with a towel or plastic wrap and let the dough rise at room temperature for 2 to 10 hours, or preferably overnight, allowing the flavor to develop fully.
- Shape the Dough: Wet your hands to prevent sticking, then turn the dough out onto a lightly floured surface. Gently fold the edges into the center to form a round loaf. Alternatively, divide the dough into two smaller loaves, tucking the ends underneath to secure shape.
- Rest Dough: Place the shaped dough on parchment paper, dust the top with flour, and score 1 to 4 lines with a sharp bread knife to allow expansion. Let it rest for 20 to 30 minutes.
- Preheat Oven: Preheat your oven to 450°F (232°C) with a baking stone, pizza stone, Dutch oven, or heavy iron skillet inside to ensure a hot baking surface.
- Bake the Bread: Carefully slide the dough with the parchment paper onto the preheated surface. To create steam and a crustier loaf, add 1 cup of hot water or 5 ice cubes to the bottom of the oven and quickly close the door to trap steam.
- Finish Baking: Bake for 25 to 30 minutes or until the crust is golden brown and crisp. Remove from oven.
- Cool: Transfer the bread onto a cooling rack and allow it to cool for at least 30 minutes before slicing. This resting period helps set the crumb.
- Store: Keep the bread in a paper bag to maintain its crusty exterior while preventing it from becoming soggy.
Notes
- Using bread flour will yield a chewier texture compared to all-purpose flour.
- For a more sourdough-like flavor, allow the dough to ferment at the cooler end of the suggested time (closer to 10 hours or overnight).
- Adding steam to the oven is crucial for creating a crispy crust; don’t skip this step.
- Scoring the dough controls where it expands during baking and creates an appealing look.
- Store the bread at room temperature for up to 3 days; freezing extends shelf life.
Nutrition
- Serving Size: 1 slice (approx. 60 grams)
- Calories: 160
- Sugar: 0.2 grams
- Sodium: 210 mg
- Fat: 0.5 grams
- Saturated Fat: 0.1 grams
- Unsaturated Fat: 0.3 grams
- Trans Fat: 0 grams
- Carbohydrates: 33 grams
- Fiber: 1.5 grams
- Protein: 5 grams
- Cholesterol: 0 mg
Keywords: artisan bread, no-knead bread, crusty bread, homemade bread, easy bread recipe