Mini Chocolate Cakes with Marshmallow Filling and Chocolate Coating Recipe
Introduction
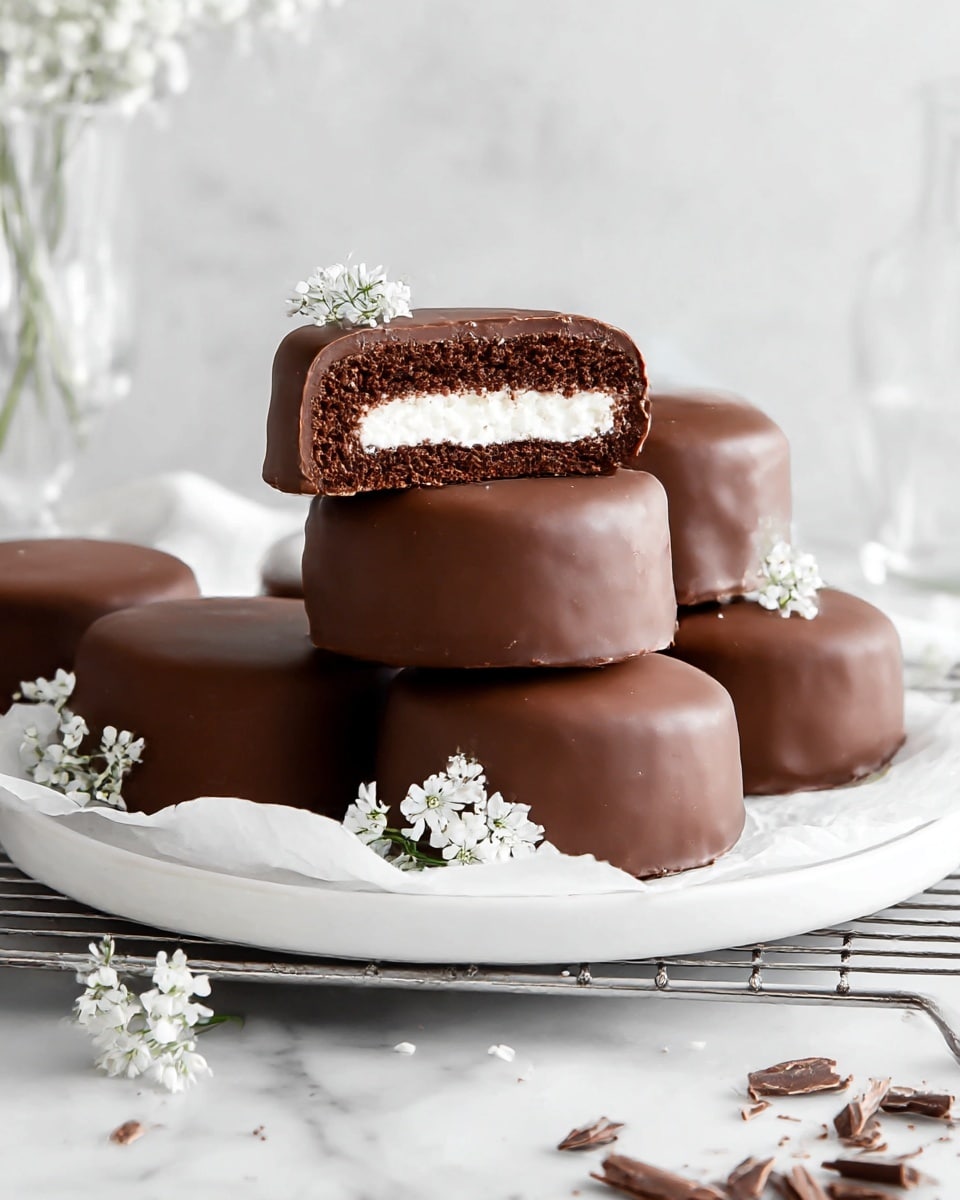
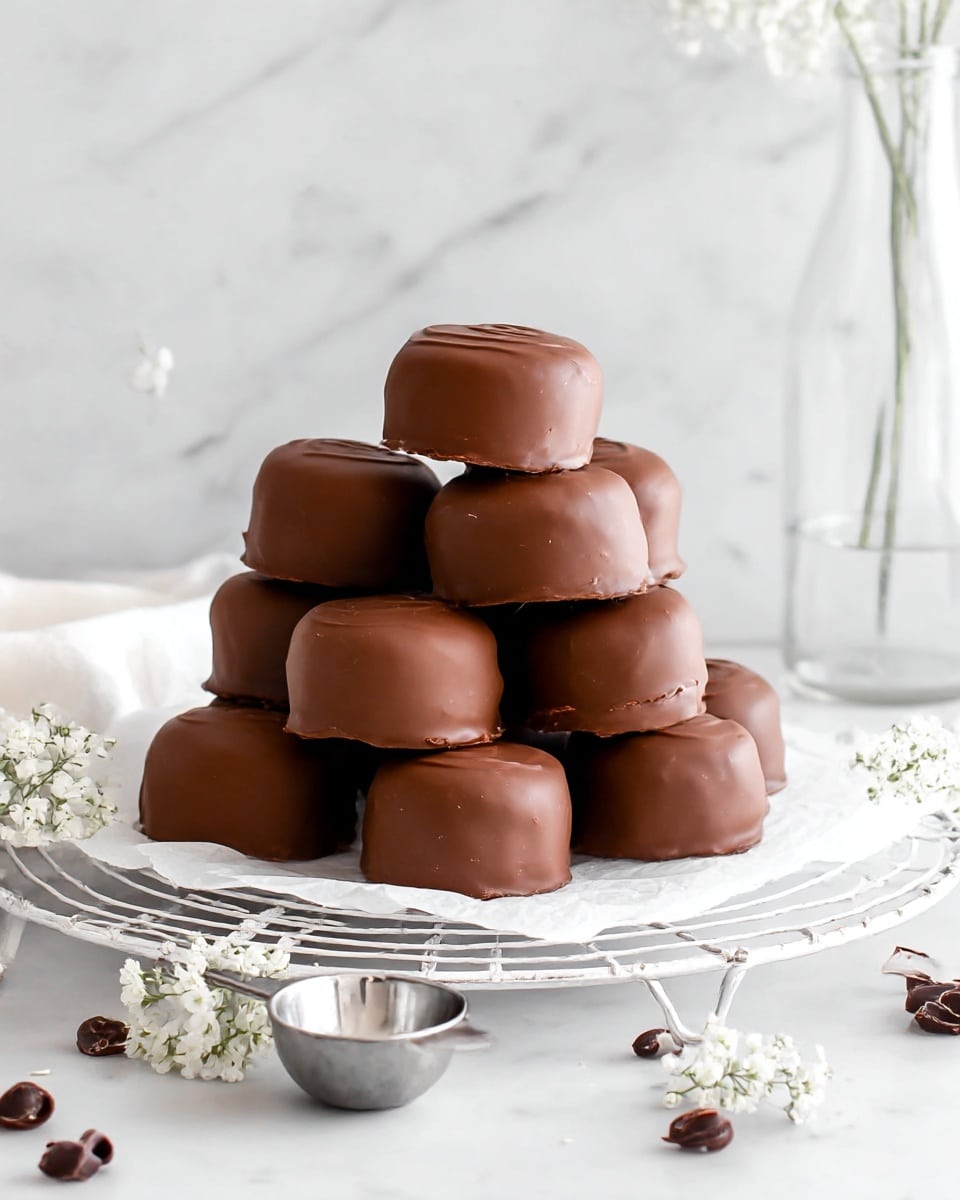
These Mini Chocolate Cakes with Marshmallow Filling and Chocolate Coating are a delightful treat for chocolate lovers. Moist, rich cakes are filled with fluffy marshmallow cream and enveloped in a smooth chocolate shell, making each bite a perfect balance of textures and flavors.
Ingredients
- ¾ cup Dutch process cocoa powder (sifted)
- 1 cup boiling water
- 1¾ cups all purpose flour
- 1½ cups granulated sugar
- 2½ teaspoons baking powder
- ¾ teaspoon salt
- 2 large eggs (room temperature)
- ¾ cup whole milk
- ½ cup vegetable oil
- 1¾ teaspoons vanilla extract
- 2 large egg whites
- ⅔ cup granulated sugar
- 8 teaspoons water
- 4 cups melted or tempered chocolate
Instructions
- Step 1: Preheat your oven to 350℉ and spray your mini cake pans with baking spray. Set aside.
- Step 2: In a small bowl, whisk together the sifted cocoa powder and boiling water until smooth. Set aside to cool slightly.
- Step 3: In a large bowl, whisk together the flour, sugar, baking powder, and salt until well combined.
- Step 4: Add the eggs, milk, vegetable oil, and vanilla extract to the dry ingredients, then whisk until the batter is smooth.
- Step 5: Stir the cocoa mixture into the batter until evenly incorporated.
- Step 6: Spoon the batter into the prepared molds, filling each about two-thirds full.
- Step 7: Bake for 18-20 minutes or until a toothpick inserted into the center comes out clean. Let the cakes cool completely.
- Step 8: To make the marshmallow filling, beat the egg whites until stiff peaks form.
- Step 9: In a small saucepan, combine the granulated sugar and water. Cook over medium-low heat, stirring until the sugar dissolves.
- Step 10: Stop stirring and use a wet pastry brush to brush down the sides of the pan to prevent crystallization.
- Step 11: Continue cooking without stirring until the syrup reaches 246℉–250℉ on a candy thermometer.
- Step 12: With your mixer running, slowly pour the hot sugar syrup into the beaten egg whites.
- Step 13: Beat the mixture until it cools and becomes glossy and thick.
- Step 14: Level the cooled cakes and use a cupcake corer or spoon to hollow out the center of each.
- Step 15: Fill a piping bag with the marshmallow filling and pipe it into the hollowed centers of the cakes.
- Step 16: Place the cut-out cake lids back on top of each filled cake.
- Step 17: Dip the bottom of each assembled cake into the melted chocolate and place on a parchment-lined sheet pan to set.
- Step 18: Set the cakes on a wire rack and spoon melted chocolate over the tops to fully coat them.
- Step 19: Allow the chocolate to set completely before serving.
Tips & Variations
- For a glossy finish, temper the chocolate properly before dipping the cakes.
- Use high-quality Dutch process cocoa for a richer chocolate flavor in the cake.
- For a flavored filling, add a few drops of peppermint or orange extract to the marshmallow mixture.
- Substitute vegetable oil with melted butter for a slightly different texture and flavor.
Storage
Store the mini cakes in an airtight container at room temperature for up to 3 days. For longer storage, refrigerate them for up to one week. Allow refrigerated cakes to come to room temperature before serving. If needed, reheat briefly in a warm oven to refresh the texture of the chocolate coating.
How to Serve
Serve this delicious recipe with your favorite sides.
FAQs
Can I make the marshmallow filling ahead of time?
Yes, you can prepare the marshmallow filling a few hours in advance. Keep it covered at room temperature and give it a quick whisk before piping if it thickens too much.
What type of chocolate works best for coating?
High-quality couverture or baking chocolate that melts smoothly works best for coating. Tempered chocolate will give you a shiny finish with a firm snap.
PrintMini Chocolate Cakes with Marshmallow Filling and Chocolate Coating Recipe

These Mini Chocolate Cakes with Marshmallow Filling and Chocolate Coating are a decadent treat featuring moist cocoa-infused cakes filled with fluffy marshmallow cream and encased in a luscious melted chocolate coating. Perfect for special occasions or a delightful dessert, these bite-sized cakes combine rich chocolate flavor with a soft, sweet center and a glossy finish.
- Prep Time: 25 minutes
- Cook Time: 20 minutes
- Total Time: 55 minutes
- Yield: 12 mini cakes 1x
- Category: Baking
- Method: Baking
- Cuisine: American
Ingredients
Cake Ingredients
- ¾ cup Dutch process cocoa powder (sifted)
- 1 cup boiling water
- 1¾ cups all purpose flour
- 1½ cups granulated sugar
- 2½ teaspoons baking powder
- ¾ teaspoon salt
- 2 large eggs (room temperature)
- ¾ cup whole milk
- ½ cup vegetable oil
- 1¾ teaspoons vanilla extract
Marshmallow Filling Ingredients
- 2 large egg whites
- ⅔ cup granulated sugar
- 8 teaspoons water
Chocolate Coating
- 4 cups melted or tempered chocolate
Instructions
- Prepare Oven and Pans: Preheat your oven to 350°F. Grease your molds or mini cake pans with baking spray to prevent sticking, then set them aside.
- Make Cocoa Mixture: In a small bowl, whisk together the sifted Dutch process cocoa powder and boiling water until smooth. Set this mixture aside to cool slightly.
- Combine Dry Ingredients: In a large mixing bowl, whisk together the all-purpose flour, granulated sugar, baking powder, and salt.
- Add Wet Ingredients: Add the eggs, whole milk, vegetable oil, and vanilla extract to the dry ingredients. Whisk until the mixture becomes smooth and homogeneous.
- Incorporate Cocoa Mixture: Stir in the cocoa and water mixture thoroughly until fully combined, yielding a rich chocolate batter.
- Fill Molds: Spoon the batter into the prepared molds, filling each about two-thirds full to allow room for rising.
- Bake Cakes: Bake in the preheated oven for 18-20 minutes, or until a toothpick inserted into the center of the cakes comes out clean. Remove from oven and allow to cool completely.
- Beat Egg Whites: While the cakes bake, prepare the marshmallow filling. Beat the egg whites in a clean bowl until stiff peaks form, ensuring the whites are firm and glossy.
- Cook Sugar Syrup: In a small saucepan, combine the granulated sugar and water. Cook over medium-low heat, stirring until the sugar dissolves completely.
- Clean Pot Sides: Stop stirring and use a pastry brush dipped in water to brush down the sides of the saucepan. This prevents sugar crystals from forming on the pot walls.
- Finish Sugar Syrup: Continue cooking the syrup without stirring until it reaches 246°F to 250°F (soft-ball stage).
- Combine Syrup and Egg Whites: With an electric mixer running on low speed, slowly pour the hot sugar syrup into the beaten egg whites in a thin stream.
- Beat Until Cool: Increase the mixer speed and continue beating the mixture until it cools completely and thickens into a glossy marshmallow fluff.
- Core and Fill Cakes: Level the top of the cooled cakes. Using a cupcake corer or spoon, carefully hollow out a small portion in the center of each cake, creating a cavity for the filling.
- Pipe Marshmallow Filling: Transfer the marshmallow filling to a piping bag. Pipe the filling into each cored cake cavity until full.
- Replace Cake Lids: Take the cut-out portions and place them back on top of each filled cake to enclose the marshmallow filling.
- Dip in Chocolate: Dip the bottom of each mini cake into the melted or tempered chocolate coating, then place them onto a parchment-lined sheet pan to set.
- Cool and Coat Top: Set the cakes on a wire cooling rack. Spoon the remaining melted chocolate over the tops and sides of the cakes to cover them completely with a smooth chocolate shell.
- Allow to Set: Let the chocolate coating fully set before serving, ensuring a firm, glossy finish on the mini cakes.
Notes
- Ensure egg whites are at room temperature for best volume when beating to stiff peaks.
- Use a candy or instant-read thermometer to accurately reach the sugar syrup’s temperature for marshmallow filling.
- Melt or temper the chocolate carefully to prevent blooming and achieve shiny coating.
- For easier assembly, chill the cakes slightly before coring and filling.
- Store finished cakes in an airtight container at room temperature or in the refrigerator for up to 3 days.
Keywords: mini chocolate cakes, marshmallow filling, chocolate coating, chocolate dessert, baked mini cakes