Oreo Dump Cake Recipe
If you have a sweet tooth and love a dessert that combines simplicity with indulgence, this Oreo Dump Cake Recipe is exactly what you need. It’s a delightful, layered treat that’s easy to whip up and impresses everyone with its rich chocolate flavor, creamy texture, and the unmistakable crunch of Oreos. Whether you are new to dump cakes or a seasoned pro, this recipe shows you how to transform a handful of basic ingredients into a luscious, comforting dessert that’s perfect for any occasion.
Ingredients You’ll Need
These ingredients are wonderfully straightforward but each plays a crucial role in bringing the Oreo Dump Cake Recipe to life. From the iconic Oreo cookies adding texture and flavor, to the creamy condensed milk and Cool Whip giving it a smooth, luscious consistency, every component is essential for creating that perfect balance of taste and texture.
- Oreo cookies: 20 cookies bring the classic chocolate and cream crunch that defines this dessert.
- Sweetened condensed milk: One 14-ounce can adds sweetness and a silky smooth binding layer.
- Cool Whip: An 8-ounce container, thawed, provides a creamy, light topping that balances richness.
- Chocolate cake mix: One box forms the cake layer, keeping things easy while adding deep chocolate flavor.
- Butter: ¾ cup, sliced into pats to melt on top, creating a golden, buttery crust as it bakes.
How to Make Oreo Dump Cake Recipe
Step 1: Prepare Your Baking Dish
Start by preheating your oven to 350°F (175°C). Lightly grease a 9×13-inch baking dish with butter or non-stick spray to ensure your cake will release easily once baked. This simple prep step avoids any stuck edges and makes cleanup a breeze.
Step 2: Layer the Oreos
Arrange two layers of 10 Oreo cookies each across the bottom of the prepared dish. This creates a crunchy, chocolatey base that will soften ever so slightly as it bakes, soaking up the condensed milk and Cool Whip flavors beautifully.
Step 3: Add Sweetened Condensed Milk and Cool Whip
Pour the entire 14-ounce can of sweetened condensed milk evenly over the Oreo layers. This gooey layer adds deep, creamy sweetness that ties everything together. Next, spread the thawed Cool Whip gently on top, creating a fluffy, creamy topping that contrasts perfectly with the denser layers below.
Step 4: Sprinkle the Cake Mix
Evenly sprinkle one box of chocolate cake mix over the Cool Whip layer. Use a fork to gently rake and break up any clumps so the cake mix is light and spread out evenly. This dry layer will absorb moisture during baking and create a soft, chocolaty crust.
Step 5: Add Butter and Bake
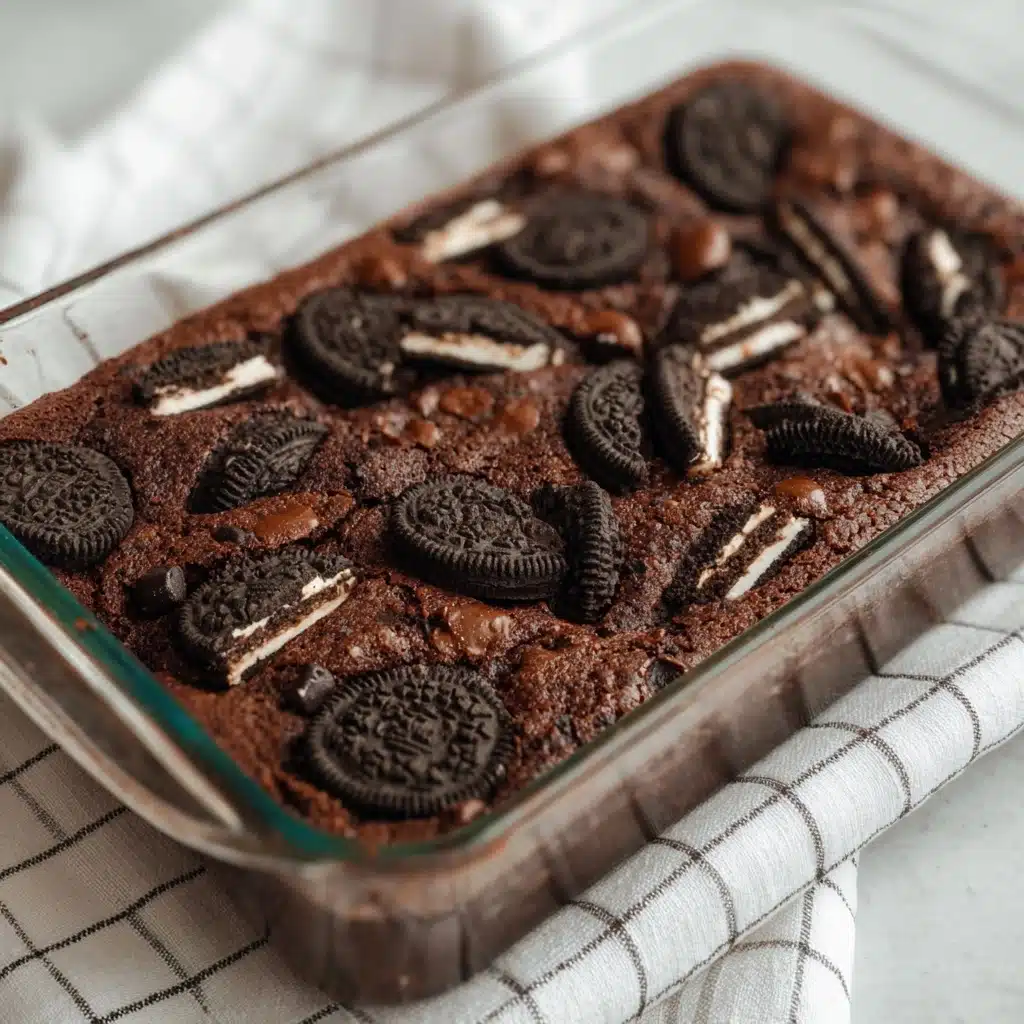
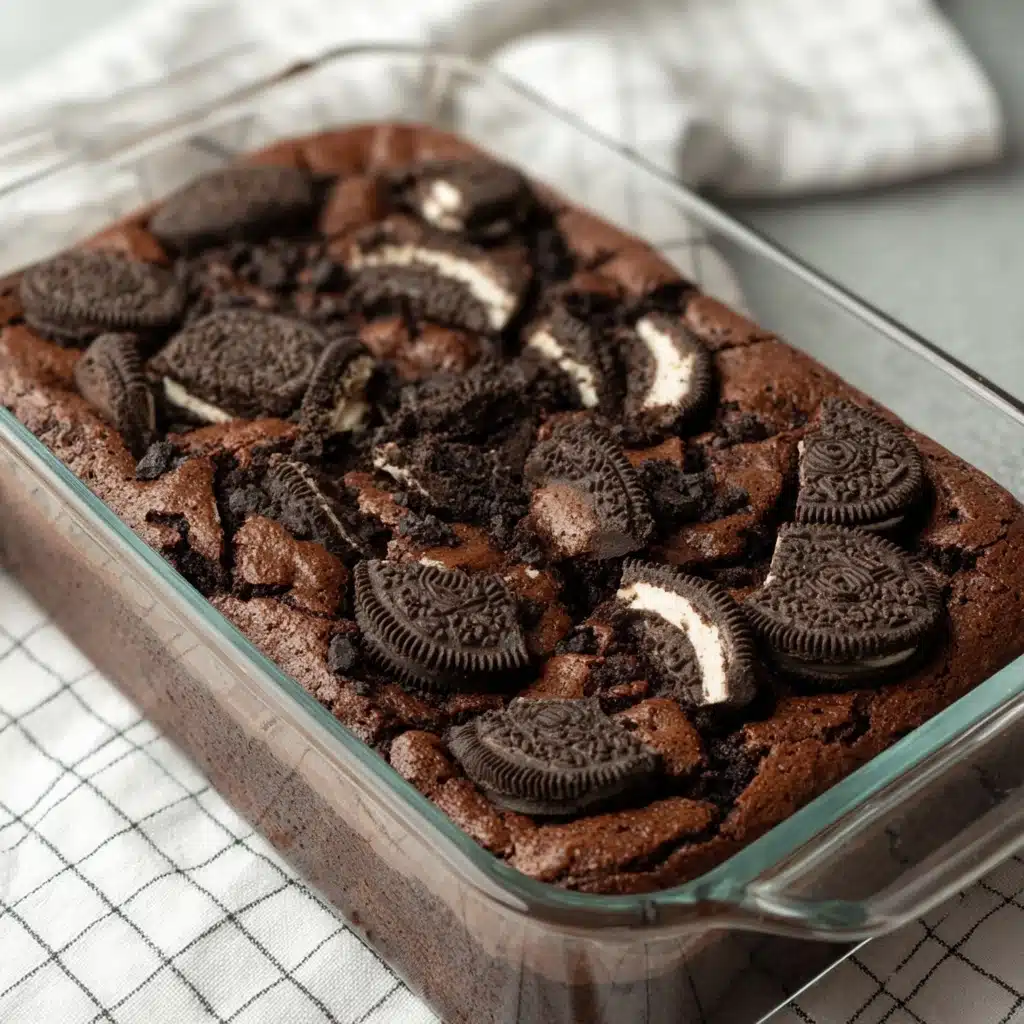
Cut the butter into small pats or slices and scatter them across the cake mix to cover as much surface as possible. These butter pats will melt into the cake as it bakes, producing a rich, golden crust. Bake in the preheated oven for 40 to 45 minutes, or until the top is bubbly and golden. Let the cake cool slightly before serving to allow everything to set perfectly.
How to Serve Oreo Dump Cake Recipe
Garnishes
Enhance your Oreo Dump Cake Recipe by adding fun garnishes like a dollop of whipped cream, a drizzle of chocolate or caramel sauce, or even a sprinkle of crushed Oreos on top. Fresh berries can provide a lovely pop of color and a hint of tartness that contrasts the rich sweetness.
Side Dishes
This dessert shines on its own but pairs beautifully with cold milk or a scoop of vanilla ice cream for those extra special indulgences. It can also be served alongside fresh fruit or a simple espresso to round out your dessert experience.
Creative Ways to Present
For a charming presentation, serve the Oreo Dump Cake Recipe in individual glass jars or clear bowls to showcase all the delicious layers. You can also cut it into squares and serve with a mint leaf or edible flower for a touch of elegance that’s sure to wow your guests.
Make Ahead and Storage
Storing Leftovers
If you have any leftovers, cover the Oreo Dump Cake tightly with plastic wrap or foil and store it in the refrigerator. It will keep well for about 3 to 4 days, allowing the flavors to meld even more deliciously.
Freezing
You can freeze the cake by wrapping it securely in plastic wrap and then aluminum foil to prevent freezer burn. For best texture, consume within 1 to 2 months. When ready to enjoy, thaw it overnight in the fridge.
Reheating
To warm up your leftover Oreo Dump Cake Recipe, simply microwave individual portions for 20 to 30 seconds or heat the whole dish at 300°F (150°C) for about 15 minutes until warmed through. Be careful not to overheat, as the whipped topping can melt away.
FAQs
Can I use a different flavor of cake mix?
Absolutely! While chocolate complements the Oreos perfectly, you could try vanilla or even red velvet for a fun twist. Just remember that the flavor of the cake mix will shine through, so pick one that pairs well with chocolate.
Is there a way to make this Oreo Dump Cake Recipe gluten-free?
Yes. You can substitute gluten-free chocolate cake mix and gluten-free Oreos, which are available in many stores. This way, the dessert remains safe for those with gluten sensitivities without sacrificing flavor.
Can I prepare this dessert ahead of time for a party?
Definitely! In fact, making the Oreo Dump Cake Recipe a few hours in advance allows the flavors to mingle. Just bake it shortly before serving or reheat slightly if you prefer it warm.
What’s the best way to crush the Oreos if I want a finer texture?
You can place the Oreos in a resealable plastic bag and gently crush them with a rolling pin or use a food processor for a finer crumb. This will change the texture but still taste delicious.
Is it necessary to use sweetened condensed milk?
Sweetened condensed milk is key to this recipe’s creamy sweetness and structure. Using a substitute might affect the texture and flavor significantly, so it’s best to stick with it for authentic results.
Final Thoughts
There’s something incredibly satisfying about the ease and deliciousness of this Oreo Dump Cake Recipe. It’s the kind of dessert that feels like a warm hug on a plate, perfect for sharing with loved ones or indulging on your own. Give it a try—you might just find it becoming your new go-to favorite for effortless entertaining or cozy nights in.
PrintOreo Dump Cake Recipe

This Oreo Dump Cake is an incredibly easy and delicious dessert that layers Oreo cookies, sweetened condensed milk, Cool Whip, chocolate cake mix, and butter to create a rich, moist, and indulgent treat. Perfect for any occasion, it requires minimal prep and yields a decadent cake with the irresistible flavors of chocolate and cookies.
- Prep Time: 15 minutes
- Cook Time: 40-45 minutes
- Total Time: 55-60 minutes
- Yield: 12 servings 1x
- Category: Dessert
- Method: Baking
- Cuisine: American
- Diet: Vegetarian
Ingredients
Cookies
- 20 Oreo cookies
Dairy
- 1 8-ounce container of Cool Whip, thawed for about 15 minutes
- ¾ cup (1 ½ sticks or 12 tablespoons) butter, cut into 12 pats
Sweetener
- 14 ounces sweetened condensed milk (1 14-ounce can)
Mix
- 1 box of chocolate cake mix
Instructions
- Prep the oven and pan: Preheat your oven to 350°F (175°C). Lightly grease a 9×13-inch baking dish with butter or non-stick cooking spray to prevent sticking.
- Layer Oreo cookies: Place two layers of 10 Oreo cookies each evenly across the bottom of the prepared baking dish, covering the entire surface.
- Add sweetened condensed milk: Pour the 14 ounces of sweetened condensed milk evenly over the Oreo cookie layers, allowing it to soak through slightly.
- Spread Cool Whip: Using a spatula, spread the 8 ounces of thawed Cool Whip evenly over the condensed milk layer to create a creamy topping.
- Sprinkle cake mix: Evenly sprinkle the entire box of chocolate cake mix on top of the Cool Whip layer. Use a fork to rake through the mix and break up any lumps for an even distribution.
- Add butter pats: Cut ¾ cup of butter into 1 tablespoon slices and scatter them over the cake mix layer, covering as much surface area as possible. Do not stir or mix the layers.
- Bake: Place the baking dish in the preheated oven and bake for 40 to 45 minutes, until the top is golden brown and the dessert is bubbly around the edges.
- Cool and serve: Remove the cake from the oven and allow it to cool slightly before serving. This helps the layers set and improves flavor and texture.
Notes
- For a richer flavor, use full-fat butter and sweetened condensed milk.
- Allow Cool Whip to thaw properly to spread smoothly and evenly.
- Do not mix the layers after adding butter pats; this helps create a crispy topping.
- You can add chopped nuts or chocolate chips on top before baking for extra texture.
- This dessert is best served warm but can also be enjoyed chilled.
- Store leftovers in an airtight container in the refrigerator for up to 4 days.
Nutrition
- Serving Size: 1 slice (1/12 of cake)
- Calories: 420
- Sugar: 35g
- Sodium: 320mg
- Fat: 25g
- Saturated Fat: 14g
- Unsaturated Fat: 9g
- Trans Fat: 0.5g
- Carbohydrates: 45g
- Fiber: 2g
- Protein: 5g
- Cholesterol: 55mg
Keywords: Oreo dump cake, easy dessert, chocolate cake, no-mix cake, simple baking, quick dessert, layered cake